|  | | Accounts are free. Join #retro on irc.fxnet.org, identify with NickServ and type !req. |
| |
|
|  | | |
| | #retro on irc.fxnet.org
6697 ssl · 6667 plain
modern + vintage clients welcome |
| |
|
| | | |
| | 3 people in #retro
okawari, synmuffin, thelounge76
nobody on the FTP
last upload: Archived Windows 3.0 - 11 ISO B... by archiveorg, 35d ago |
| as of 21:42 EST ·  |
|
|
| | | |
| | | releases | 2,186 | | last 24h | +0 | | online | 1.7 TB | | library | 1.4 TB | | members | 1 | | updated | 2026-11-18 21:42 |
|
|
|
| | | |
| | | |
| Device | Viewsonic Optiquest Q9 |
| Difficulty | Difficult |
| Time | 10 - 15 minutes |
| Steps | 19 |
This guide is by Philip Honnold on iFixit and is licensed under Creative Commons Attribution-NonCommercial-ShareAlike 3.0. ByteRot mirrors it for non-commercial preservation: formatting changed and photos resized for old browsers; full-size photos and the text are on the FTP in /DOCS/REPAIR. Original guide >>
This problem seems to happen a lot to this model of monitor. I have done this repair on close to 30 monitors over the last ~2 years we have had them, and we only have 70 or so of them on site. Signs of a monitor that is about to die are a display that takes longer and longer to come on each time. Final failure is that it no longer shows a picture at all and the power LED on the front of the monitor just flashes.
Overview of what we are going to do is to remove the monitor stand from the back of the unit. Then pop open the case, remove some shielding from around the power supply so that it can be removed. Once removed we will de-solder 1 or 2 bad capacitors and replace them. Once this is done the monitor will be rebuilt.
Tools: Desoldering Braid; Precision Utility Knife; Phillips #2 Screwdriver; Flathead 3/32" or 2.5 mm Screwdriver; Lead-Free Solder; Soldering Iron; Flush Cutter
Parts: 1,000µF 16v Electrolytic Capacitors |
|
|
| | | |
| | 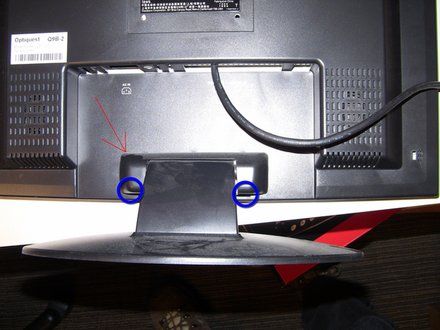
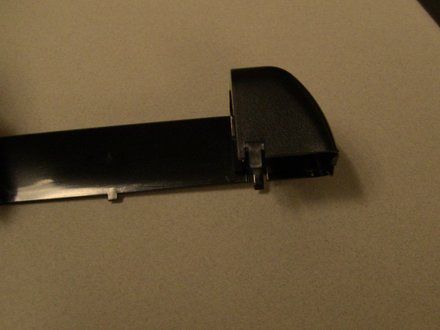
• First off unplug the monitor from power as well as from the back of the computer. Find a flat surface and lay the monitor on its face so that you can get to the back of it. The screws that hold the monitor stand on are covered by a small plastic bezel ( shown in photo with the red arrow). This is held on with just pressure and if you squeeze at the points mark with a blue circle it should pop free and the bezel can be removed.
|
|
|
| | | |
| | 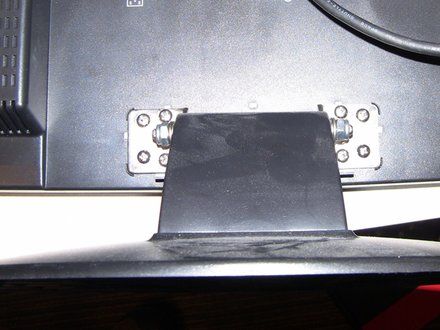
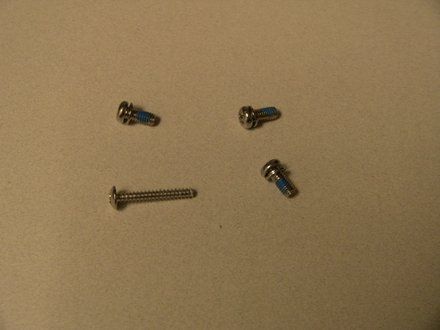
• Once the plastic bezel is removed it will expose the 8 screws that need to be removed, 4 on each side. Use the Phillips screw driver to remove these screws. There are 2 types of screws here so as you remove them take note of the hole they came out of so that you can rebuild it correctly after you are done. Here is a picture of 1 set of screws to show you the 2 different sizes. This is from the left hand set of 4 screws. They are laid out how they came out.
|
|
|
| | | |
| | 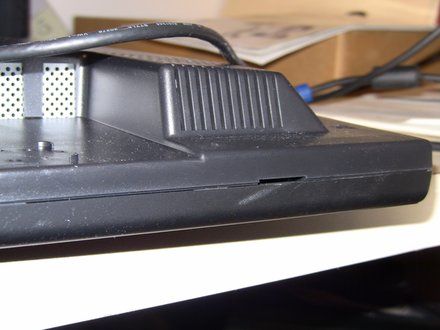
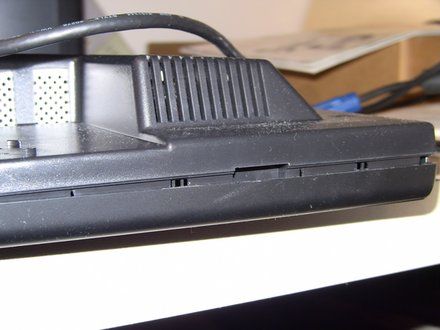
• Look at what would have been the bottom of the monitor and on the right hand side there is a small slot. This is our starting point to open up the monitor. Use a flat blade screw driver in this hole and twist it to pop open the case. At this point this case is held together by snap clips via pressure. Work from this hole across the bottom and then up both sides. Slide the screw driver in the open space between the two pieces until it gets tight and then twist gently to open the next snap points. The top is going to be the hardest to open. Keep the back flat as possible while opening.
|
|
|
| | | |
| | 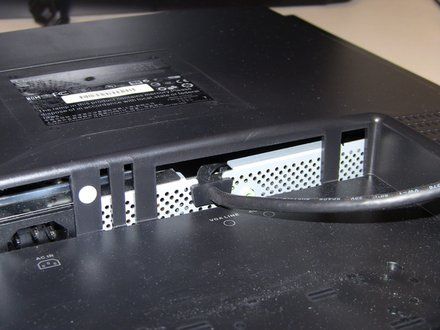
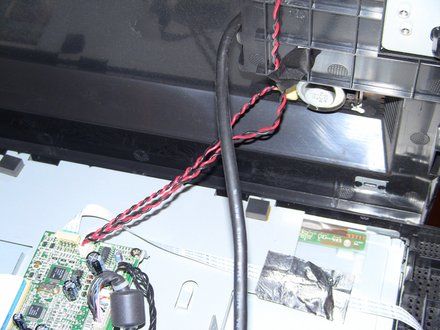
• Once the back of the monitor is loose you can start to lift it free. First item to watch is the power cord. It should slide up and be free to help open the case. Once past the power cord open/lift it as if there was a hinge on the right. Do this so you don't pull the speaker wire that is routed in that direction.
|
|
|
| | | |
| | 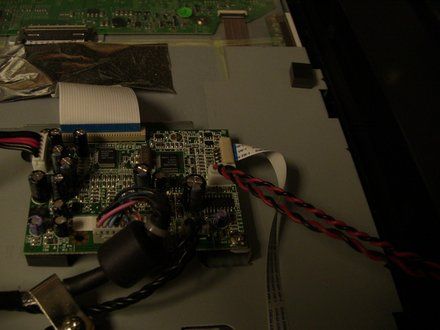
• Once the back is open you can reach this wire and unplug it from the controller board. This is a wire that is plugged in and can be removed. I have seen issues with this being very tight before and you also pull the plug and the connector off the solder leads, so be careful. Once this speaker wire has been unplugged you can set this case piece out of the way. (need better photo)
|
|
|
| | | |
| | 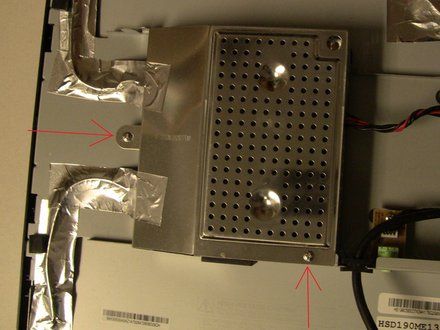
• The area that we are needing to repair is under the chromed metal cover. That is the power supply and it is shielded to help protect from interfering with the display. Remove the 2 screws that hold this on. Careful as you removed it Try not to damage the silver tape. Fold this metal case to the left.
|
|
|
| | | |
| | 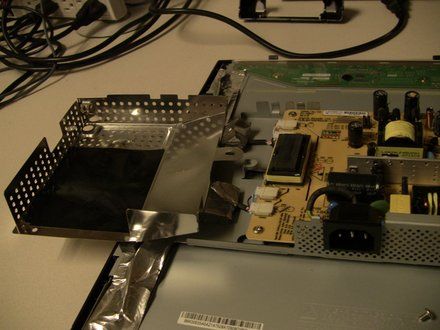
• This metal cover can be folded to the left to protect the metal tape that is covering the power wires for the LCD display and still give you room to remove the power board.
|
|
|
| | | |
| | 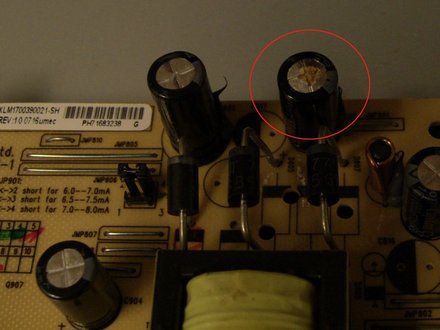
• At this point you should be able to do a visual inspection to confirm that you have a blown capacitor or not. This monitor had the most common problem. A blown 1000uf 16v cap. The second most common is that the large cap to its left is also blown.
|
|
|
| | | |
| | 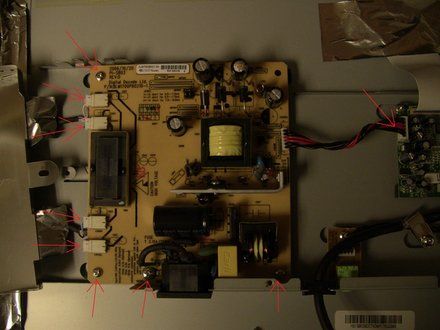
• Now that you have confirmed a blown cap the power board needs to be removed so that the bad part can be replaced. There are 4 screws and 5 cables that need unplugged to get the board free. Unplug the cables first then undo the screws, makes it easer to remove the cables, in case that is not obvious to you.
|
|
|
| | | |
| | 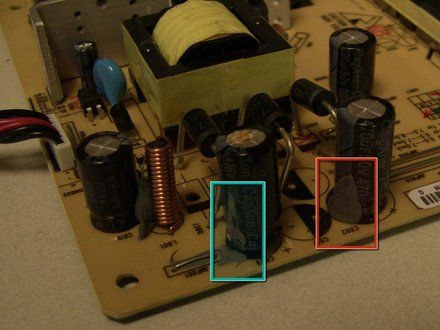
• With the board now removed we can start to remove the blown capacitor. These larger capacitors are held in place with more than just the solder joints, there is also a small blob of some sort of glue or such that hold these in place. Red square show this glob in place and blue square shows it removed. Take a Exacto knife and cut this away from the capacitor that is needing to be replaced. Your doing this on the top of the board where there shouldn't be anything you can really damage, like electronic traces, but be careful anyway.
|
|
|
| | | |
| | 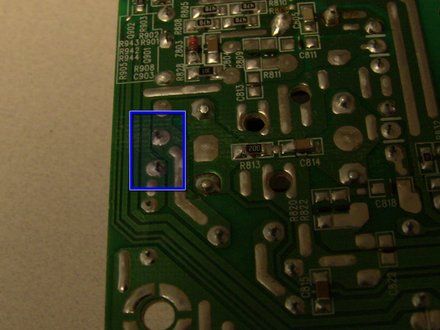
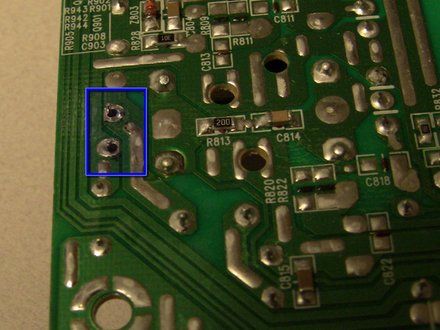
• Now flip the circuit board over and de-solder the capacitor. As this cap is close to the edge of the board it shouldn't be to hard to figure out which two points need de-soldered to get the cap free. A hot iron and the solder wic should have the cap free in just a couple moments. I have de-soldered the wrong component before so double check yourself.
|
|
|
| | | |
| | 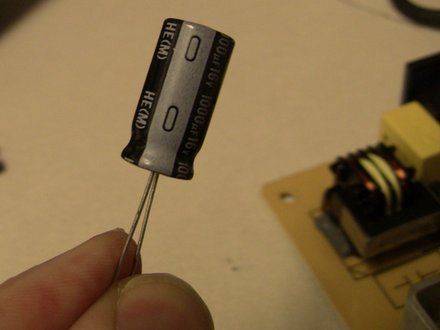
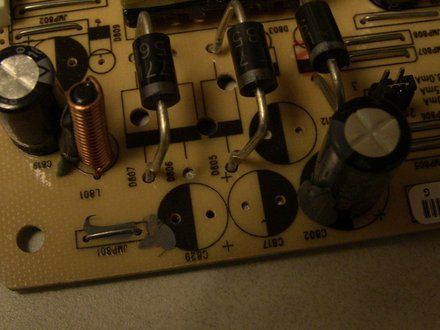
• The new capacitor can be installed and soldered in now. As you do this you need to pay attention to polarity of the cap. The negative lead is marked on the new capacitor with a gray strip and the '-' symbol in that strip, as seen in the first photo. The negative spot on the circuit board is shown by the black half of the circle on the circuit board. There is also a '+' sign next to the other hole as well. Be sure the negative lead of the capacitor goes into the negative hole of the board, and then solder down the new cap.
|
|
|
| | | |
| | 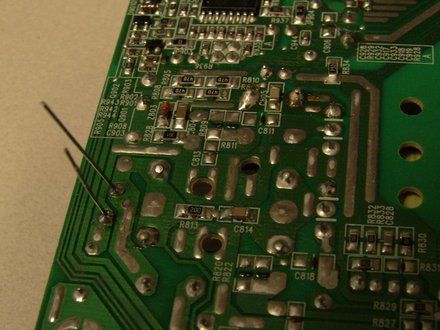
• Be sure to clip the extra length of wire from the cap after it has been soldered in. Don't leave it like the photo or you will have problems. Use wire cutters and clip those leads as close as you can to the board, with out cutting the new solder joint you just did. I also don't replace that gray compound that we cut out. For better or worse I have done maybe 30 monitors and haven't had any problems so far. Not sure what that stuff is to replace it either, so that is part of it.
|
|
|
| | | |
| | 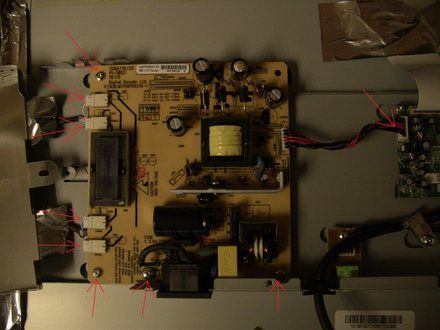
• At this point the hard work is done. The monitor now needs to be rebuilt. Put the power supply board back in place and replace the 4 screws that were removed. Once these are in then reattach the 5 cables there were unplugged. They should be resting right were they need plugged in, so it shouldn't be that hard to figure out where they go. Here is the same picture you saw a few steps ago just as a reminder.
|
|
|
| | | |
| | 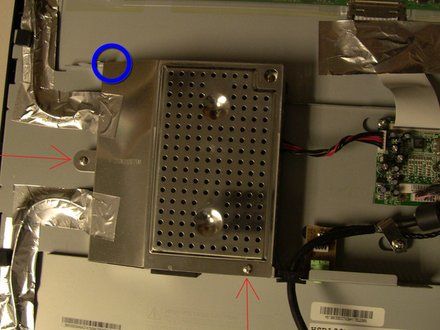
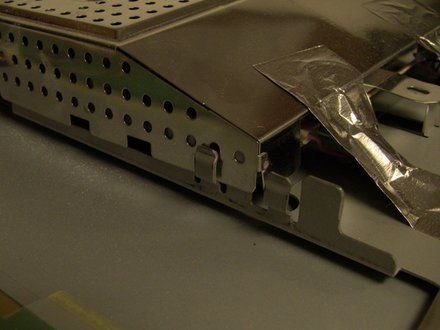
• One the power supply board is reattached the shield plate needs replaced. Again be careful about that metal shielding tape, you don't want to tear or damage it. Fold it back into place and replace the two screws to anchor it. Careful as you put it back as there is a small tab at the top that needs to be correctly placed to get the shield in place or it will keep the screw holes from lining up correctly. Blue circle in first photo shows where this tab is.
|
|
|
| | | |
| | 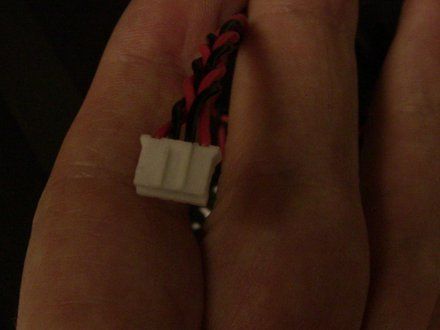
• Last cable that needs plugged in is the audio cable for the speakers on this monitor. This cable is keyed with a set of 'rails' on one face of the plug so that it can't be plugged in backward. Hold the back piece in place as if it were a hinged on the right side. Also be sure to route the video cable out the correct hole in the back as well( out the biggest hole). Once the audio is plugged in you should be able to lower the back in place and align it.
|
|
|
| | | |
| | 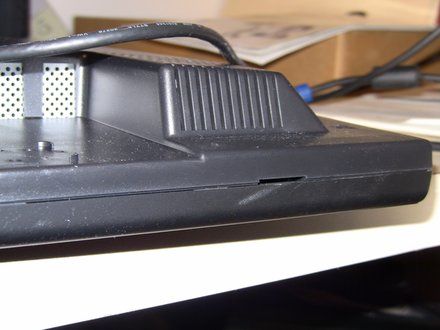
• Once the back is in place and aligned, it just needs squeezed back together. You will hear snaps and pops as it goes back together. Be sure to squeeze the edges and middle of all 4 sides. Then do a visual inspected to make sure that it has correctly snapped back together. On rare occasions I have had to re-open the back and redo it as alignment is not what it should have been.
|
|
|
| | | |
| | 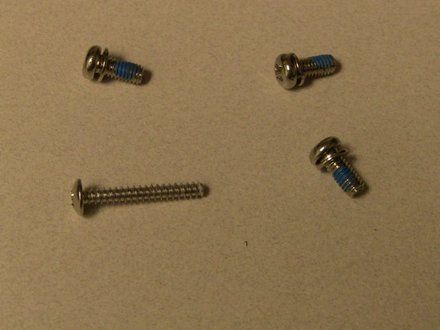
• Last step is to reattach the monitor stand with the 8 screws that were removed and then to reattach the plastic bezel that covered them. Here is a photo of the screws to show alignment. These are the screw locations for the left hand set of holes. Flip it over for the right hand set of screws. Then press the bezel into place and you should be done.
|
|
|
| | | |
| | • You should be done now, plug in the monitor and confirm that it works. Hope this guide was useful to you.
|
|
|
| | | |
| | | To reassemble your device, follow these instructions in reverse order. |
|
|
| | | |
|


















