BYTEROT - retro PCs, consoles and lost software
homearticleshow-toswhat's newlibraryrepaircommunityconnectcontributelinks
» ftp ftp.byterot.net  ::  irc #retro on irc.fxnet.org (3 here)  ::  2,186 releases  ::  25,577 library files18.11.2026
MAIN MENU::
HOME01
ARTICLES02
HOW-TOS03
WHAT'S NEW04
LIBRARY05
> REPAIR06
COMMUNITY07
CONNECT08
CONTRIBUTE09
LINKS10

GET AN ACCOUNT::
Accounts are free. Join #retro on irc.fxnet.org, identify with NickServ and type !req.
[how]

IRC::
#retro on irc.fxnet.org
6697 ssl · 6667 plain
modern + vintage clients welcome
[vintage how-to]

WHO'S AROUND::
3 people in #retro
okawari, synmuffin, thelounge76
nobody on the FTP
last upload: Archived Windows 3.0 - 11 ISO B... by archiveorg, 35d ago
as of 21:42 EST · [community]

SECTIONS::

OS


1551

DRIVERS


61

SOFTWARE


22

GAMES


10

UTILS


37

DOCS


505

INCOMING


0

REQUESTS


0

LIBRARY


25577

SOME STATS::
releases2,186
last 24h+0
online1.7 TB
library1.4 TB
members1
updated2026-11-18 21:42

FDHD FLOPPY DRIVE DISASSEMBLY::
DeviceFloppy Disk
DifficultyModerate
Time10 - 20 minutes
Steps10
This guide is by Timmytheterror on iFixit and is licensed under Creative Commons Attribution-NonCommercial-ShareAlike 3.0. ByteRot mirrors it for non-commercial preservation: formatting changed and photos resized for old browsers; full-size photos and the text are on the FTP in /DOCS/REPAIR. Original guide >>

Hello this is actually a cleaning for an FDHD Drive but since they didn't have an option for cleaning I picked disassembly.

Tools: Needle Nose Pliers; Phillips #1 Screwdriver; Isopropyl Alcohol; Paper Towels; White Lithium Grease


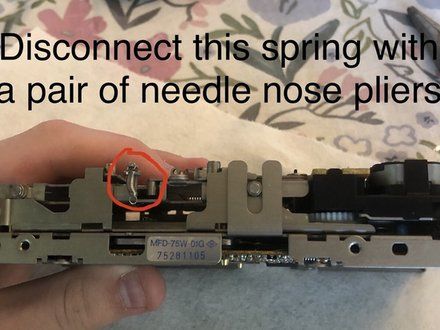
STEP 1 :: STEP 1 PULL OFF THE SPRINGS::
[step 1 photo]
• It's best to pull Down and twist to pull the spring off

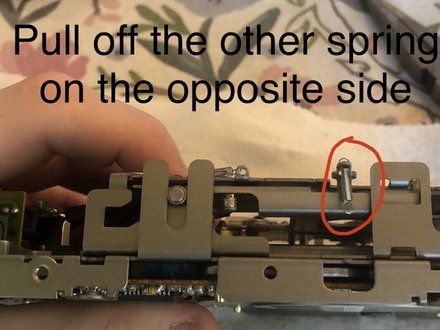
STEP 2 :: PULL THE OTHER SPRING OFF::
[step 2 photo]
• Once again pull and twist movement

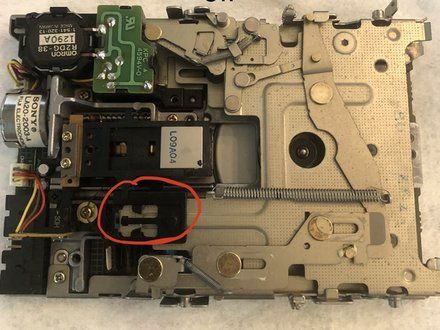
STEP 3 :: MOVE THIS BLACK TAB OFF::
[step 3 photo]
• lift up on the really tiny tab with a flat blade screwdriver and slide it off

STEP 4 :: YOU MAY WANT AN ACTUAL FLOPPY
FOR THIS PART::
• Push Down

STEP 5 :: LIFT THE MOUNTING MECHANISM OFF
OF THE DRIVE::
• It may seem a little bit tricky at first but only push the ejection lever about halfway in

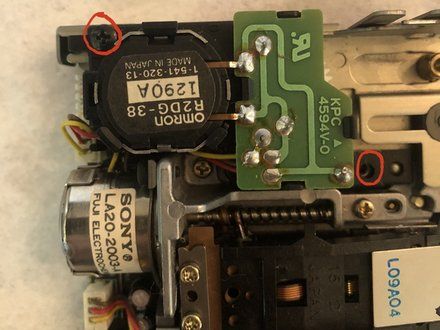
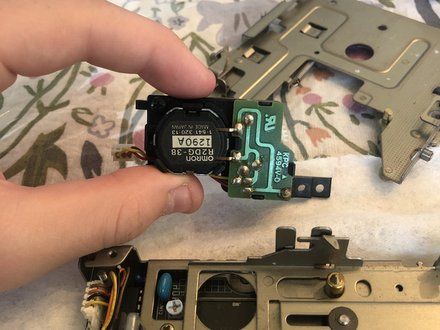
STEP 6 :: UNSCREW MOTOR::
[step 6 photo]
• Remove these two screws and lift off the motor
• Note: I did not have the second screw.

STEP 7 :: LIFT OFF MOTOR::
[step 7 photo]
• Unplug the motors 3-pin connector to make it easier

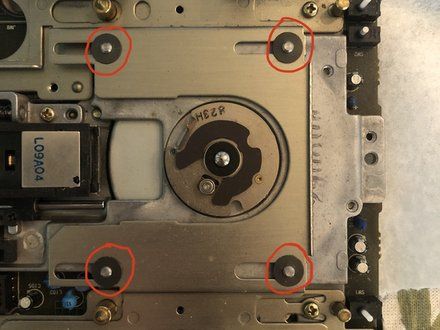
STEP 8 :: TAKE OFF THE TINY BLACK WASHERS::
[step 8 photo]
• Insert wisdom here.

STEP 9 :: WASHERS::
• Insert wisdom here.

STEP 10 :: TAKE OFF THE SLIDING PIECE::
• Thank you for using my guide just clean any places where metal touches metal and reassemble

CONCLUSION::
To reassemble your device, follow these instructions in reverse order.

CREDIT::
This guide is by Timmytheterror on iFixit and is licensed under Creative Commons Attribution-NonCommercial-ShareAlike 3.0. ByteRot mirrors it for non-commercial preservation: formatting changed and photos resized for old browsers; full-size photos and the text are on the FTP in /DOCS/REPAIR. Original guide >>
[all repair guides]

[ BYTEROT / OLD BITS FOR OLD MACHINES ]

[ByteRot] [FTP] [IRC] [Any Browser] [HTML 3.2]
© 2026 ByteRot · plain HTML 3.2, no JavaScript: works in Mosaic, Netscape, IE, Lynx and whatever you're using now · best viewed at 800x600 · built 2026-11-18