|  | | Accounts are free. Join #retro on irc.fxnet.org, identify with NickServ and type !req. |
| |
|
|  | | |
| | #retro on irc.fxnet.org
6697 ssl · 6667 plain
modern + vintage clients welcome |
| |
|
| | | |
| | 3 people in #retro
okawari, synmuffin, thelounge76
nobody on the FTP
last upload: Archived Windows 3.0 - 11 ISO B... by archiveorg, 35d ago |
| as of 21:42 EST ·  |
|
|
| | | |
| | | releases | 2,186 | | last 24h | +0 | | online | 1.7 TB | | library | 1.4 TB | | members | 1 | | updated | 2026-11-18 21:42 |
|
|
|
| | | |
| |
| | • Identify which capacitors are bad. There are 2 ways to do this:
• 1. By Look/Feel: Look for a bulged top on the capacitor. You may also feel that the vent has burst. One way to confirm suspicion of a bulged capacitor is to place a ruler on top of the capacitor with the edge touching the top. If the ruler will not stay flat, the capacitor is bulged.
• 2. (Preferred) Using an ESR meter: You can also use an ESR meter to check for bad capacitors. Once you get the ESR reading, compare it against a table of readings (usually included with the meter) or the capacitor's datasheet.
|
|
|
| | | |
| | • Before desoldering the capacitor, note its details
• These details should include capacitance(uF), voltage (V), Brand (e.g. Nichicon) and series(e.g. HM). You should also note the diameter(D) and length/height(l) of the capacitor.
|
|
|
| | | |
| | • The easiest way to find out what replacement capacitors to buy is to find the original capacitor datasheet.
• Sometimes you can find capacitor datasheets by going to a company website. You can find some capacitor company websites here (https://caps.wiki/wiki/Capacitor_Company_Websites)
• The badcaps forum (https://www.badcaps.net/forum/forumdisplay.php?f=10) is also a good place to find information about capacitors.
• When you get the datasheet, look at the provided information on diameter, length, ripple current, and ESR (for low ESR capacitors).
|
|
|
| | | |
| | • Before buying new capacitors, you will need to find an electronic components distributor.
• Some popular electronic components distributors in the USA are DigiKey (https://www.digikey.com) and Mouser (https://www.mouser.com)
• For other electronic components distributors, you can check this list (https://caps.wiki/wiki/Distributors)
|
|
|
| | | |
| | 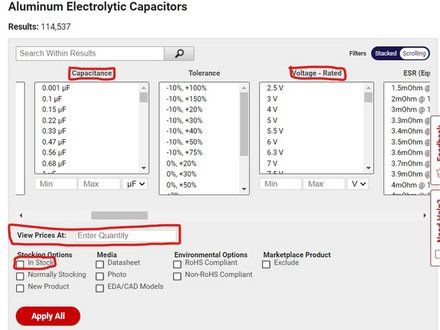
• Now we will start searching for replacement capacitors.
• First, go to the website of your electric components distributor and go to the Aluminum Electrolytic Capacitors section.
• Narrow the search by entering the capacitance(uF) and voltage (V) values of the old capacitor. You may also want to check the box to only show components that are in stock.
• Narrow the search by price. On DigiKey's website, you can do this by entering how many components you will need, located in the filters section.
• Look for a capacitor from Elna, Nichicon, Nippon Chemi-Con/United Chemi-Con, Panasonic, Rubycon or Wurth Elektronik with the same temperature rating as the old capacitor.
|
|
|
| | | |
| | 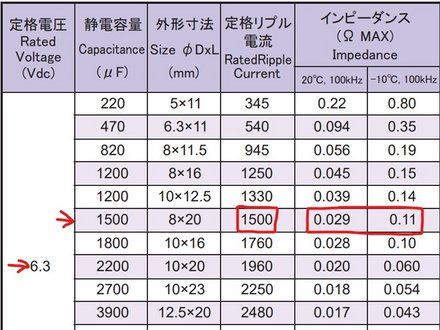
• Now take a look at the datasheet. If the ripple current is the same or higher (at the same temperature and frequency [Hz/KHz]) the ESR is the same or lower(at the same temperature and frequency [Hz/KHz]) (if applicable), and the capacitor is the same size or smaller (you can use a bigger capacitor if it will fit), then the capacitor will meet your needs.
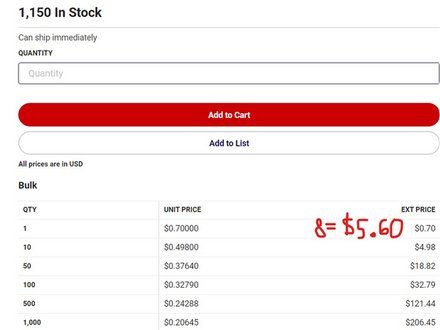
• Make sure to check pricing. Sometimes it can be the same price or cheaper to buy 10 capacitors instead of 8.
|
|
|
| | | |
| | • First, make sure the circuit board is oriented so you can see the top of the capacitor you're replacing.
• Next, use a black Sharpie or similar permanent marker to mark where the negative stripe of the capacitor meets the PCB.
• Now you can remove the electrolytic capacitors. There are 2 methods you can use:
• 1. Heat one capacitor lead and lift the capacitor lead slightly out of the board. Keep doing this until the capacitor is free from the circuit board
• 2. Desolder both legs of the capacitor, then pull the capacitor out of the circuit board.
|
|
|
| | | |
| | | To reassemble your device, follow these instructions in reverse order. |
|
|
| | | |
|


























